How to Mount a Frameless Torque Motor Using a Thick Bond Line Concept
This article explains how a thick bond line concept can be used to mount a frameless torque motor, using Alva’s SlimTorq™ 85-24 lite motor as an example. The method is ideal for applications where precise mechanical fits are not feasible, or where thermal management requirements call for structural adhesives with high conductivity.
May 28, 2025

The correct mounting of a frameless motor is essential to ensuring optimal performance, durability, and thermal efficiency - especially in applications that demand compact, high-performance motor integration. At Alva, we design high-torque slotless motors for a wide range of use cases, including gimbal motors, robotics, and aerospace systems.
What Is a Thick Bond Line?
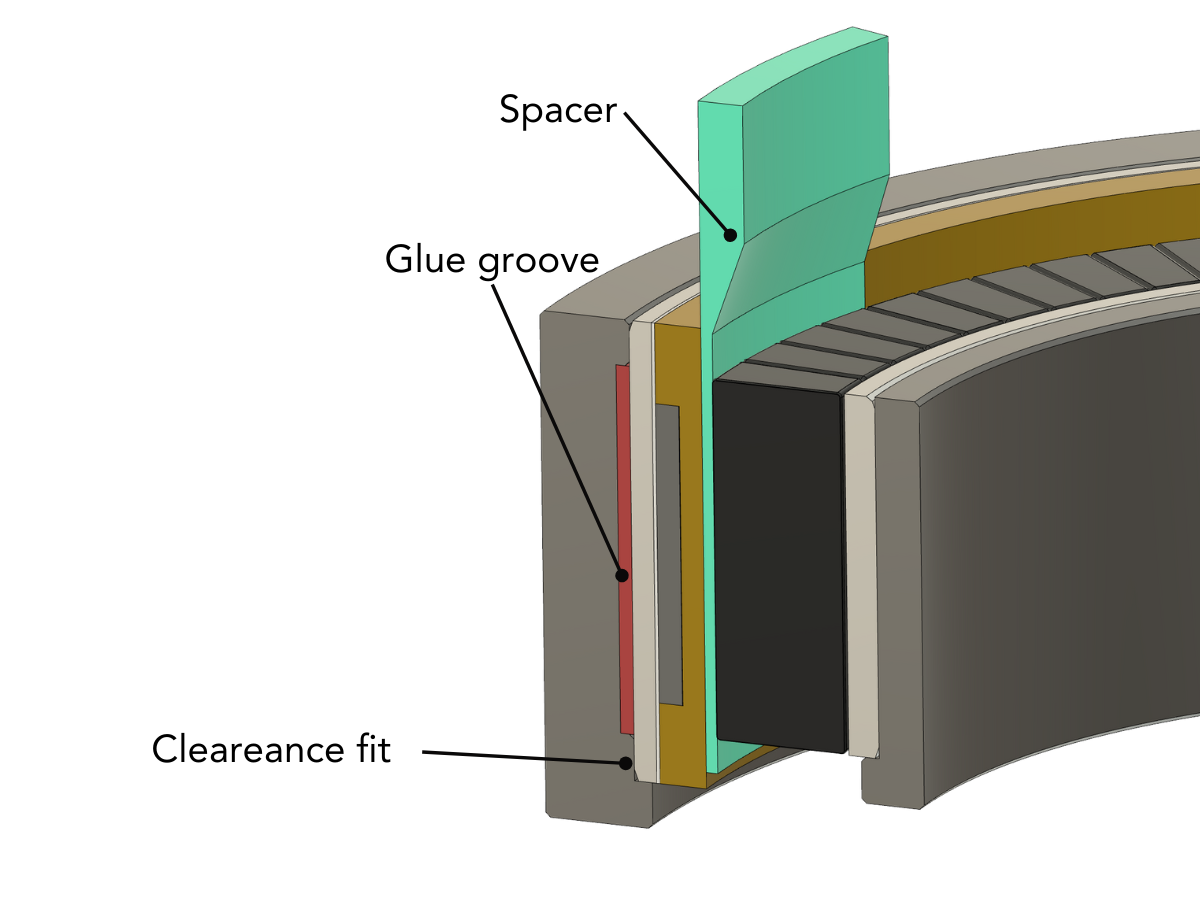
The concept of thick bond line mounting involves creating a relatively wide gap - typically several tenths of a millimeter - between:
- The outer diameter (OD) of the stator and the stator housing.
This approach allows for the use of structural adhesives with higher thermal conductivity, offering more flexibility in adhesive selection compared to a thin bond line method. A thicker bond line can be particularly useful when the housing is produced using lower-precision manufacturing techniques, such as 3D printing.
Radial and Axial Alignment
In a thick bond line assembly, alignment must be actively ensured. This can be achieved in two main ways:
- Partial aligning fit: Maintaining a tighter fit on a section of the surface.
- Alignment jig or tool: Using a fixture to hold the stator in the correct position while the adhesive cures.
In our demonstration, we use an alignment tool to center the stator on the bearing bore. This method compensates for looser tolerances and allows for accurate and repeatable placement.
While the stator may benefit from jig-assisted alignment, we recommend that the rotor is always aligned using machined surfaces on the shaft, as this ensures greater accuracy and consistency in the final assembly.
Surface Preparation Best Practices
Good surface preparation is essential for reliable adhesion and long-term motor performance. At Alva, we recommend the following surface preparation steps:
For anodized aluminum (e.g. stator OD):
- Clean with isopropanol alcohol using a lint-free cloth.
- Allow the surface to dry completely.
For bare aluminum (e.g. stator housing ID):
- Clean with isopropanol alcohol to remove oils and debris.
- Roughen the surface using 80-grit sandpaper.
- Clean again with isopropanol to remove sanding residue and let it dry.
Note: Cleaning before sanding helps prevent oil and contaminants from being embedded into the surface.
Proper surface preparation ensures strong adhesive bonding and supports better thermal conductivity across the bonded interface.
Thermal Considerations in Thick Bond Lines
The thermal resistance of a bonded joint is determined by the thermal conductivity of the adhesive and the thickness of the bond line.
- A thin bond line using standard adhesive may achieve similar thermal resistance to a thicker bond line using a high-conductivity adhesive.
- The most critical factor is eliminating air-filled voids, which severely impair thermal transfer.
No matter the bond line thickness, ensuring full adhesive coverage is key to optimizing thermal performance in any frameless torque motor integration.
Step-by-Step Mounting: Stator to Housing
In our demonstration using the SlimTorq™ 85-24 lite motor, we apply the thick bond line method to mount the stator into the housing:
- Initial cleaning
- Clean the stator OD and housing ID with isopropanol and a lint-free cloth.
- Surface roughening
- Roughen the inside of the stator housing with 80-grit sandpaper.
- Final cleaning
- Clean both surfaces again and allow them to fully dry.
- Adhesive application (housing)
- Apply a layer of thermally conductive structural adhesive evenly to the inside of the housing.
- Mounting setup
- Position the housing on the alignment tool for accurate stator placement.
- Adhesive application (stator)
- Apply adhesive evenly to the stator’s OD, ensuring full surface coverage.
- Assembly
- Insert the stator into the housing, guided by the alignment tool.
- Finishing step
- Wipe away any excess adhesive and allow the adhesive to cure.
- Final removal
- Once cured, remove the alignment tool. The stator is now securely mounted and ready to be assembled with the rotor and shaft.
Make sure your design accommodates adhesive squeeze-out and avoids adhesive entering sensitive areas like bearings.
Why Use a Thick Bond Line?
The thick bond line method is well-suited for engineers and system integrators working with:
- Gimbal motors
- Frameless slotless or slotted motors
- Custom housings or low-tolerance mechanical parts
- Applications requiring thermal adhesives
This method ensures:
- High flexibility in adhesive selection
- Good mechanical retention even in wider bond gaps
- Thermal efficiency when paired with high-conductivity adhesive
- Precise alignment using jigs or fixtures
Contact
Nicolas Giraudo
Chief Commercial Officer
Fossegrenda 1, 7038 Trondheim, Norway

All rights reserved ©2025